Installing the Serial Check Reader
Thank you for purchasing your check reader through PowerChurch Software. To start using the check reader, just follow these simple steps to connect the reader to your computer. Once it's connected, you're ready to start scanning checks. There is no software to install.
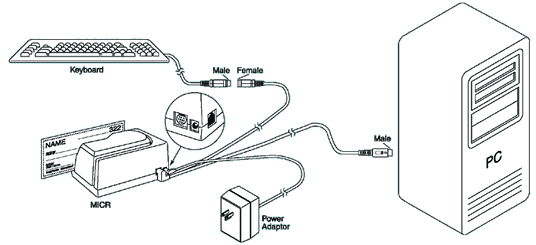
Click diagram for larger version
- Shut down Windows and then turn off your computer.
- Disconnect the keyboard from the computer.
- Connect the keyboard cable to the interface cable that came with the check reader.
- Plug the interface cable into the check reader.
- Plug the interface cable from the check reader into the keyboard input on your computer.
- Plug the power adapter for the check reader into the reader and then into the wall outlet.
- Turn the computer on. The LED indicator should turn on to a steady green.
NOTE: You should place the check reader at least 6 inches away from the computer monitor and any other electronic devices to avoid interference.
Your check reader is now ready to use. Just start PowerChurch Plus Version 8.5 or higher and start scanning your checks. For more information on how the check reader works, just take a look in your PowerChurch Plus manual.
If that's not enough reading for you, you can also check out the online version of the Check Reader Technical Manual. Appendix C is a handy troubleshooting guide if you run into problems.
Please note that each check reader is opened here and tested to verify that they are correctly formatted to work with PowerChurch Plus, so don't worry if the packaging has been opened.
Last updated: 03/10/2014

